
Introduction
The Opportunity Project for Cities Sprint Toolkit is your guide to tackling community challenges with speed, creativity, and impact. Whether you’re a local government leader, technologist, or community advocate, this toolkit equips you with the tools to deliver real, resident-driven solutions. We’ve distilled lessons from past projects to make this guide simple, dynamic, and actionable.
What This Toolkit Does for You
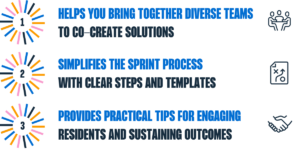
With this guide, you’ll learn how to run a sprint that builds trust with your community and delivers real solutions to local challenges.
Sprint Basics Made Simple
The Opportunity Project for Cities is a project inspired by the Opportunity Project started by the US Census. Sprints are focused, timebound processes that bring together governments, community partners, and technologists to solve specific problems. Here’s how it works:
1. Define the Problem: Collaborate with residents to understand their most pressing needs.
2. Assemble the Team: Build a diverse group of policymakers, technologists, and community leaders.
- Tip: Use stakeholder mapping to ensure representation from all relevant voices
3. Develop and Test Solutions: Prototype quickly, test with residents, and refine based on feedback.
- Action: Conduct pop-up workshops or use quick surveys to gather feedback in real-time.
4. Implement and Scale: Turn your prototype into a lasting solution by aligning it with local goals and systems.
- Example: The green jobs platform in St. Paul started as a sprint idea and became a citywide workforce tool.
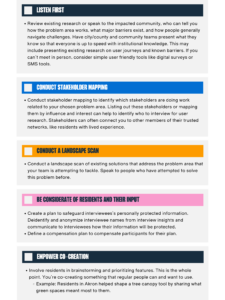
Defining the Problem
Every great solution starts with clearly identifying the problem. This phase ensures your sprint tackles issues that truly matter to residents. Here’s how to define the problem effectively:
1. Pick a problem:
- Determine the problem area. Try to define a problem that is smaller than a general issue area (like “housing”) but larger than a specific challenge you already know about (like “difficulty accessing assistance”). A right-sized problem area leaves room for research to expose challenges but provides a clear direction for investigation.
- Assess strategic plans of all major stakeholders. Look at the city/county and community partners’ strategic plans and identify salient issues with broad support and opportunities for tech improvement.
- Look for areas with a clear mandate from the city/county or community perspective. Has someone already identified an issue and or a solution? Is there momentum toward working on a specific issue?
- Consider the problem focus area template. Share them widely and ensure that anyone who might benefit from your work knows and supports the project.
2. Gather Data:
- Create a list of data systems with information relevant to the selected problem area. Liaise with owners of those data systems, including looking across departments and jurisdictions to build new relationships with data owners. The list of data systems does not need to be complete to be helpful!
- Create a list of datasets, or a data inventory that includes which system data is contained in and other relevant metadata. Share the data inventory with sprint teams and ensure that data in the inventory is accessible and usable. Consider that the data you list here should connect to your problem understanding research and be used to determine which solution you ultimately pursue in the next phase connects to the data you list here.
- Review your data inventory and identify data that maps to the problem statement. Any data that was highlighted by user interviews can be considered high-value data.
- Beware of data silos (or interdepartmental data sharing issues). Consider what data you might need and not currently have access to. If you can’t easily get access to that data, what options do you have? Is the issue timing? Privacy? Can you replicate the data through surveying or another method?
- Improve data that is not high-quality by working with data owners to process and analyze raw datasets, focusing on improving high-value data. This often takes time, resources, and data processing expertise. Raw data, or data that is in its original, uncurated form, is the best data to work with when possible.
- Investigate any needs to protect sensitive data. Make plans to protect personally identifiable information if any exists, and work directly with project leaders, including the product owner if one exists, and data owners to ensure that data protections are written into data and product governance.
3. Frame the Challenge:
- Turn insights into a clear problem statement. Be specific about who is affected, what the problem is, and why it matters.
- Example: “How might we make commuting safer and more comfortable for Miami residents during extreme heat events?”
4. Prioritize:
- Focus on problems that are actionable and align with your team’s resources. Ensure the problem is neither too broad nor too narrow to address within the sprint timeframe.
- Pro Tip: Avoid assuming solutions at this stage. Instead, keep the focus on understanding the problem deeply.
Resources
Resident Engagement: The Heart of Your Sprint
To build solutions that matter, you need to start with the people who will use them. We call this user research.
1. How to Engage Residents Effectively:
2. Document observations and insights
- Conduct synthesis sessions to collate the user research and begin documenting user observations about data-specific challenges and technical needs. Try connecting things people say in interviews to data sources that you have available.
- Use whatever framework you like best (sticky notes, asynchronous brainstorming, interview tagging) to identify major themes from your workshops and isolate key insights. Highlight themes or insights that are associated with a high concentration of observations about data or information challenges; these might be particularly impactful to address with a technical solution.
- Include a part of your synthesis workshop that explores how people need solutions. What features matter to people dealing with this challenge?
3. Refine your understanding of the problem
- Create a more detailed problem statement that is relevant to your problem area. A problem statement is a specific element of your chosen problem area that exposes the challenge your future tool will try to solve. The problem statement should clearly identify who is affected by the challenge and why it matters to your community. You should also try to avoid including an answer to the problem within your problem statement.
- Pro Tip: Share progress updates with residents to show them how their input is shaping the project. Trust builds when people see their voices lead to action.
Collaboration That Works
Great sprints rely on strong partnerships. Here’s how to make teamwork seamless:
1. Set Clear Roles: Define responsibilities early. For example:
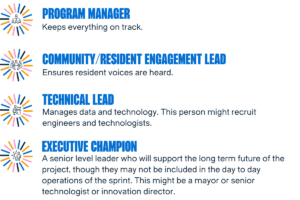
- Establish regular touchpoints with city/county leaders and key decision-makers to involve them as advocates for your project and ensure they provide ongoing support and deblock any challenges.
- Use the roles and responsibilities resource to identify the appropriate participants to include in the team. As facilitators of the TOPC sprint, the city/county team needs to set internal roles before seeking out sprint participants, including additional city/county staff, community partners, and tech partners.
- Use the RACI template to assign roles and responsibilities for all team members. Engaging the right people at the right times is essential to making inclusive decisions, gaining buy-in from key partners, and keeping the sprint progressing.
2. Use Agile Practices: Borrow from software teams to stay nimble. Meet regularly to check in on progress of the project and remove barriers.
- Daily stand-ups: Quick team check-ins to share progress.
- Weekly meetings: Deep dives into the project plan and goals.
- Retrospectives: Reflect on what’s working and what isn’t.
- Project plan: Prioritize what will get done by whom and when. Doubly important is recognizing what will not get accomplished and why.
3. Leverage Digital Tools:
- Create a shared drive for any assets that you may collect on the project and centralize for easy sharing
- Use Miro for brainstorming, Trello for task management, or Slack for communication.
- Use tools like Figma or Adobe XD for wireframing.
Pro Tip: Conflict happens—be ready. Establish a safe space for addressing issues and keep the focus on shared goals.
Prototyping and iteration
Prototyping is where ideas become real. The goal? Build quickly, test often, and learn fast.
Steps to a Great Prototype:
1. Start Small: Use low-fidelity prototypes like sketches or mockups.

- Using everything you learned in the problem understanding phase, work with the tech team to co-design wireframes (sketches or mockups) that prioritize users’ preferred ways to access information or data. Be sure to consider the accessibility needs of the population.
- Your wireframes don’t need to be full featured versions of the product. They can be as simple as a drawing that shows where features live and how they interact with each other. More sophisticated teams may make mockups that include city or community branding from the website that will host the tool using Figma or Adobe XD.
2. Test with Residents: Observe how people interact with your prototype and gather their feedback. We call this user testing.
- Work with your community partner to organize user tests made up of target users for the product. Note: beneficiaries of the product and target users might be different groups! Think about who will actually be using the product and speak directly to them.
- Use best practices from Civic User Testing (CUT) group models to ensure that sessions are designed to be inclusive and engaging to participating community members.
- Consider varying formats for how and when you test. Handouts might be great for one audience, whereas a very stripped-down demo that people can click around might be good for others.
- Compensating users participating in tests for their time based on the recommendations of local community organizations and service providers is a best practice that shows appreciation for the time and contributions of your testers and encourages participation.
3. Iterate and Improve: Use feedback to refine your solution. Focus on what matters most to residents.
- Pro Tip: Metrics matter. Track task completion rates or satisfaction scores to measure prototype effectiveness.
Resources
Building an MVP (Minimum Viable Product)
A prototype is a great first step. You may take it a step further and develop an MVP (Minimum Viable Product). An MVP is more full featured than a prototype (though some people may use MVP and prototype interchangeably) but isn’t yet a full featured product ready for widespread distribution. The product or tool may still need refinement but creating an MVP is a huge milestone. It means that you have the right problem and a good idea of a solution that can help solve that problem.
1. Work closely with stakeholders
- Work closely with community partners and target users to integrate user feedback into the final MVP and set up data linkages that will make the prototype work.
- Liaise with data owners who are contributing data to the product to ensure that data will be stored appropriately in city/county or community partner data systems and revisit data protection needs identified in Phase 1. Ensure that workflows exist to update the data regularly and that relevant data owners are read into their responsibilities with regard to the product’s maintenance to keep it up-to-date and accurate.
- Conduct any final feedback sessions to ensure that final designs are aligned with the expectations of all stakeholders and team members. Prioritize feedback from community partners and adjust the course depending on their expressed needs.
2. Demonstrate the MVP
- Communicate the definition of an MVP to any key stakeholders and sprint participants to ensure that your collaborators understand the role of an MVP. Ensure that they understand the benefits and shortcomings of the tool and how it might improve over time, with the right support from stakeholders.
- Share your product with anyone who has helped you along the way! Use this as an opportunity to open up a dialogue with community members and share how and why you built this prototype. Consider hosting a “Demo Day,” an event where you publicly launch and showcase your product to your community. A Demo Day guide is included to show you what goes into planning Demo Day during TOPC 2023.
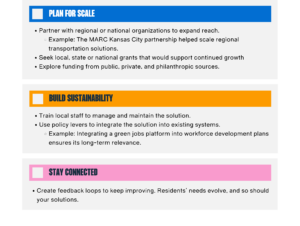
From Prototype to Impact
Now that you’ve launched the first prototype of your product, you can start working with your team to make sure the product can continue to grow and change over time. You may need to work with a wider range of stakeholders to ensure your product has a long-term home and consistent resourcing. Transitioning a prototype into a scalable solution takes planning. Here’s how to do it:
 Resources
Thank you!
The Centre for Public Impact and the Beeck Center for Social Impact + Innovation at Georgetown University partnered to launch the TOPC program and have developed this toolkit to document guidance based on pilot sprints conducted in San José, CA, and Saint Paul, MN, followed by a second sprint that included Macon County, GA, Miami Dade County, FL, Long Beach, CA and Detroit, MI and a third sprint that featured Macon County, GA, Miami Dade County, FL, and Detroit, MI alongside newcomer Akron, OH.
This toolkit is a living document that will capture best practices from the ongoing TOPC program. The TOPC program was developed with generous support and guidance from the Knight Foundation and Google.org. The TOPC program was based on The Opportunity Project (TOP), which was created by Census Open Innovation Labs in 2016. This toolkit was designed for local governments as a companion to the TOPx Toolkit for federal agencies. This toolkit was initially written by Katya Abazajian, Katie Stenclik, and Andrea Mirviss, and the latest version includes contributions from Rebecca Ierardo, Harold Moore, Elham Ali, and Tahmid Islam. It was originally released on August 19, 2021, under a Creative Commons Attribution-ShareAlike license and should be cited as: “TOPC sprint toolkit: a guide for community-driven innovation sprints in cities” (2025). Washington, D.C.


